UV Sticker | Laser cutting | customised works for branding

How to Print Custom PET Sheets at Home (DIY Guide)
If you're looking to print custom PET sheets at home for DTF (Direct-to-Film) transfers, there are a few important things you should know. While it is possible for small-scale projects, professional-quality DTF printing requires specialized equipment.
7/8/20262 min read
Can You Print PET Sheets at Home?
Yes, but with limitations.
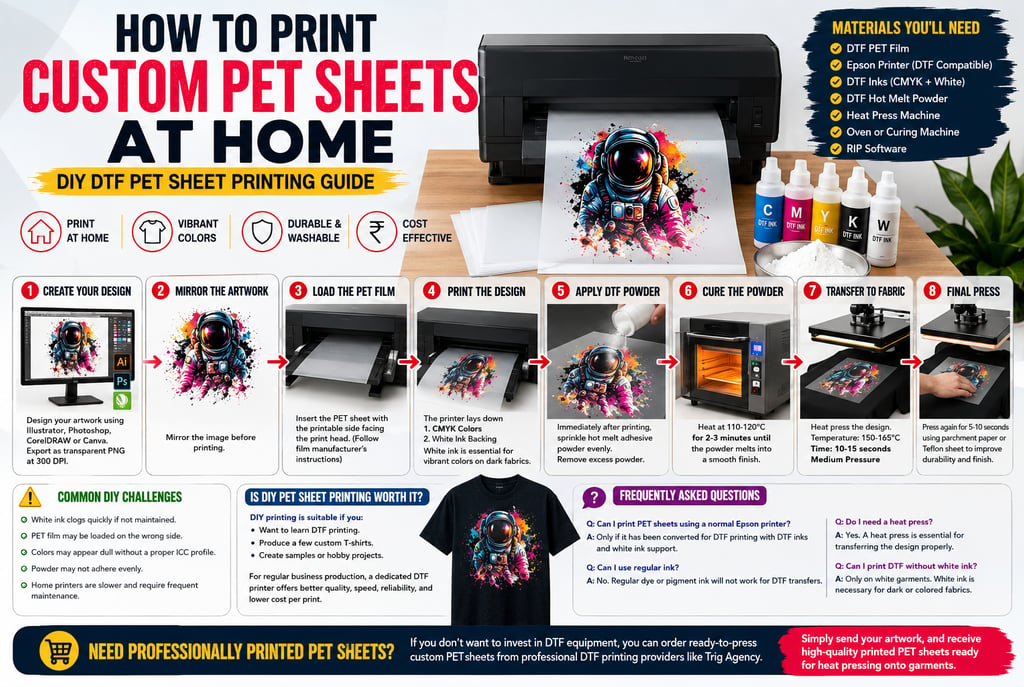
You can print on DTF PET film at home if you have:
A compatible Epson inkjet printer (converted for DTF)
DTF pigment inks
DTF PET transfer film
Hot melt adhesive powder
A heat press machine
Curing equipment (oven or heat curing device)
A regular home printer with standard ink cannot produce durable DTT transfers.
Materials You'll Need
DTF PET Transfer Film (Cold Peel or Hot Peel)
Epson Inkjet Printer (L1800, L805, XP-15000, or converted DTF printer)
DTF CMYK + White Ink
RIP Software (AcroRIP, CADlink, PrintFactory, etc.)
DTF Hot Melt Powder
Heat Press Machine
Oven or Powder Curing Machine
Cotton or lint-free cloth
Step-by-Step Process
Step 1: Create Your Design
Design your artwork using:
Adobe Illustrator
CorelDRAW
Photoshop
Canva (for simple graphics)
Export as a transparent PNG at 300 DPI.
Step 2: Mirror the Artwork
Mirror the image before printing if required by your workflow.
Step 3: Load the PET Film
Insert the PET sheet with the printable side facing the print head (follow the film manufacturer's instructions).
Step 4: Print the Design
The printer lays down:
CMYK colors
White ink backing
White ink is essential for vibrant colors on dark fabrics.
Step 5: Apply DTF Powder
Immediately after printing:
Sprinkle hot melt adhesive powder evenly.
Remove excess powder.
Step 6: Cure the Powder
Heat at approximately:
110–120°C
2–3 minutes
until the powder melts into a smooth finish.
Step 7: Transfer to Fabric
Heat press the design:
Temperature: 150–165°C
Time: 10–15 seconds
Medium pressure
Allow the film to cool (for cold peel) or follow the film's peel instructions.
Step 8: Final Press
Press again for 5–10 seconds using parchment paper or a Teflon sheet to improve durability and finish.
Common DIY Challenges
White ink clogs quickly if not maintained.
PET film may be loaded on the wrong side.
Colors may appear dull without a proper ICC profile.
Powder may not adhere evenly.
Home printers are slower and require frequent maintenance.
Is DIY PET Sheet Printing Worth It?
DIY printing is suitable if you:
Want to learn DTF printing.
Produce a few custom T-shirts.
Create samples or hobby projects.
For regular business production, a dedicated DTF printer offers:
Better color accuracy
Faster printing
Lower cost per print
Higher reliability
Professional-quality output
Frequently Asked Questions
Can I print PET sheets using a normal Epson printer?
Only if it has been converted for DTF printing with DTF inks and white ink support.
Can I use regular ink?
No. Regular dye or pigment ink will not work for DTF transfers.
Do I need a heat press?
Yes. A heat press is essential for transferring the design properly.
Can I print DTF without white ink?
Only on white garments. White ink is necessary for dark or colored fabrics.
Need Professionally Printed PET Sheets?
If you don't want to invest in DTF equipment, you can order ready-to-press custom PET sheets from professional DTF printing providers like Trig Agency. Simply send your artwork, and receive high-quality printed PET sheets ready for heat pressing onto garments.
Trig Agency
UV Sticker & UV DTF Printing
DTF T-Shirt Printing
Embroidery Services
Corporate & Event T-Shirts
MDF Laser Cutting & UV Printing
Acrylic Gifts & Custom Products
Sign Boards, ACP & LED Branding
Corporate Gifting Solutions
Custom Stickers & Product Labels
Return Gifts & Kids Products
Promotional Printing & Branding
Graphic Design & Packaging Support
Contact
Newsletter
trigagencybengaluru@gmail.com
8660231532
© 2026. All rights reserved Trig Agency.